Dynamic Actions in Salesforce empower users to select the actions they want to display in the Highlights Panel on a record page for a particular object. This feature enables users to have control over the visibility of each action, allowing them to determine which actions are visible based on specific criteria they define.
What are Dynamic Actions?
Dynamic Actions allow you to design clean, user-friendly, and adaptable pages that show users only the actions they require, determined by specific criteria you define.
Instead of sifting through a never-ending list of actions, your users will be presented with a straightforward selection that aligns with their role, profile, or when a record fulfills certain conditions.
You’ll configure which actions are accessible and when they appear within the Lightning App Builder, departing from the conventional page layout editor. This streamlines administrative tasks and reduces the time and energy required.
Dynamic Actions will be accessible in your production instance starting from the Summer ’20 release.
Dynamic Actions Tutorial
To activate Dynamic Actions in the Lightning App Builder, go into edit mode on a Lightning Page. Then, choose the Highlights Panel and check the box that says “Enable Dynamic Actions.” This action should be repeated for each Lightning Page where you want to utilize Dynamic Actions.
With the box ticked we have a new option to “Add Action”.
Tip: If there isn’t already a Highlights Panel component in the layout, you should consider adding one.
Get Started with Dynamic Actions
Let’s begin strategizing how you can leverage your newly acquired #AwesomeAdmin capabilities to craft the action layout for your Lightning Page. To get started, we should thoroughly assess the business process related to your custom object. This involves identifying which specific actions are required, when they should be triggered, and who will be responsible for executing them.
1. Add universally required actions:
After enabling Dynamic Actions on your Lightning Page, click the “Add Action” button to begin the process of adding actions. To start, consider including actions that are universally required, ensuring they are always available, such as “Edit” or “Clone.”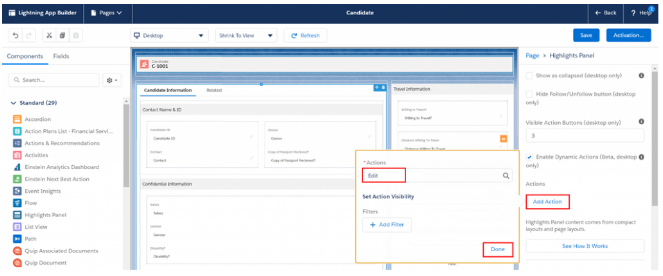
2. Reorder actions:
You can rearrange actions at any point by simply using drag-and-drop, just like you can reorder tabs.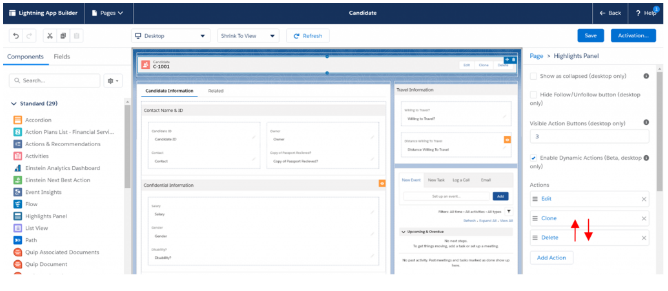
3. Make an action conditionally visible based on a field value:
In the initial scenario, a recruiter should be allowed to request a copy of a passport only if one hasn’t been received already. The indication of whether a copy has been received is determined by a checkbox on the Candidate record page.
To implement this, follow these steps:
1. With the Highlights Bar selected, select “Add Action” and locate the “Request Copy Of Passport” action.
2. Next, click on “+ Add Filter” and define the display criteria. In this case, the action should only be displayed if the “Copy of Passport Received?” checkbox is set to false (i.e., unticked).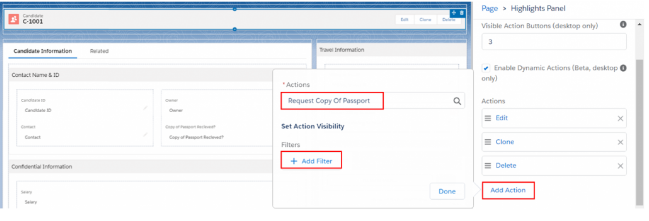
3. Click “Done” to complete the setup.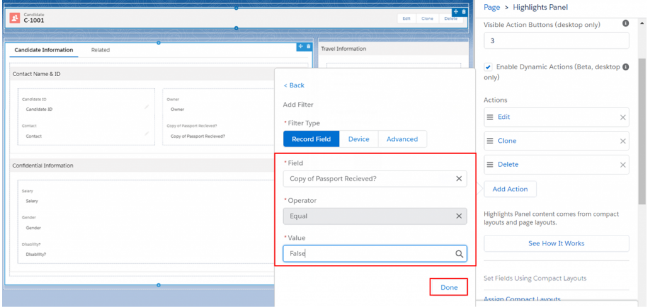
You can identify a conditionally displayed action by the presence of an eye icon next to it.
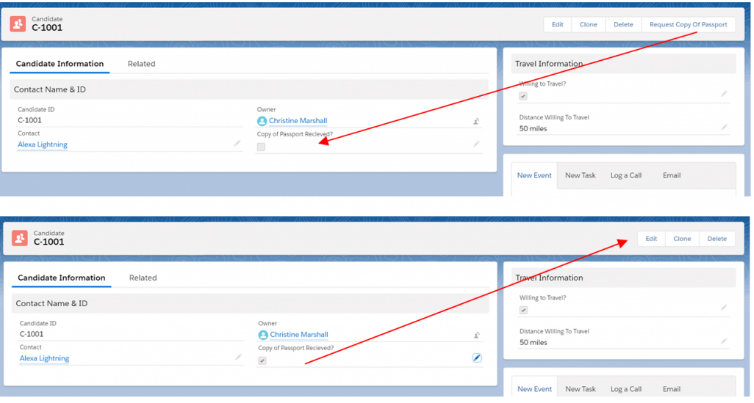
Now, let’s observe this feature in action: When the “Copy of Passport Received?” checkbox is not selected, our user can see and use the action to request a copy. However, the moment the checkbox is marked, the action disappears to prevent any accidental re-request.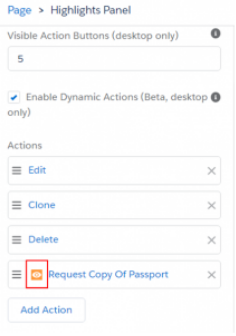
4. Make an action conditionally visible based on a user’s profile
Certainly, you may have actions within your Salesforce environment that should only be accessible to specific users, roles, or profiles. Traditionally, controlling the visibility of these actions required creating different page layouts. However, with the introduction of Dynamic Actions, you can manage this visibility directly from the Lightning App Builder.
For example, let’s consider a scenario where you only want a “Send To Hiring Manager” action to be available when a Recruitment Manager interacts with a candidate’s information.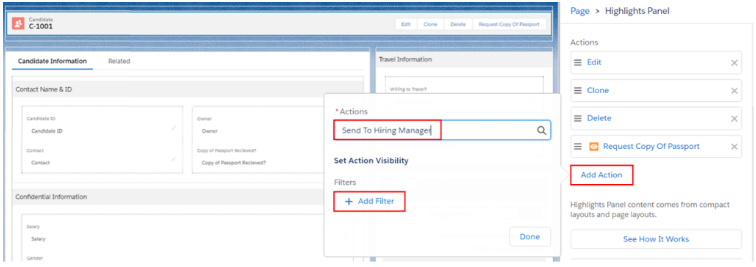
To achieve this, you can utilize the Highlights Bar. Start by selecting it and then choose to “Add Action.” Locate the “Send To Hiring Manager” action in your list of actions. Next, click on “+ Add Filter” to define your display criteria. In this case, you would opt for the “Advanced” filter type.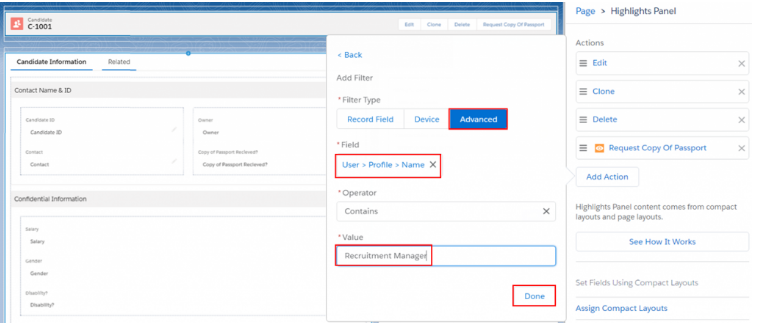
Your specific filter criteria would be to display this action only if the user’s profile is set to “Recruitment Manager.” Click “Done” to finalize the setup.\
Now, when you view a candidate’s record, you won’t see the action. This is precisely the outcome you desire, as only users with the Recruitment Manager profile should have access to it. If, for instance, you’re logged in with the System Administrator profile, the action should remain hidden.
This capability streamlines the process of managing action visibility, eliminating the need for multiple page layouts.
5. Add mobile actions (beta)
You have the ability to include identical dynamic actions on the mobile layout. This can be achieved by opting for “Enable dynamic actions from the Highlights Panel for the Salesforce mobile app (Beta).”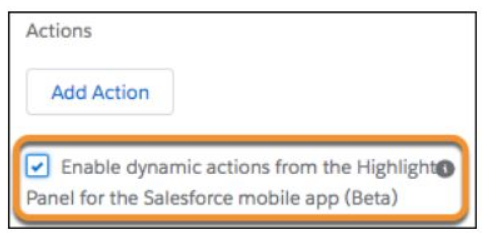
Source: “Unleash New Flexibility with Dynamic Actions on Desktop (GA and Beta) and Mobile (Beta).”
Moreover, you have the option to apply a distinct set of dynamic actions specifically for mobile. To do so, while viewing your record page, navigate to the Page properties pane and select “Enable page-level dynamic actions for the Salesforce mobile app (Beta).”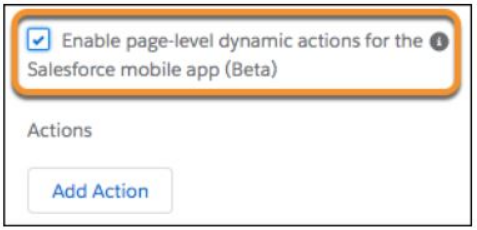
Source: “Unleash New Flexibility with Dynamic Actions on Desktop (GA and Beta) and Mobile (Beta).”
Dynamic Actions Bar
Starting with the Summer ’21 release, you’ll have the capability to customize a comprehensive Dynamic Actions Bar. This feature empowers you to include both standard and custom actions while also allowing you to determine the visibility settings for the entire bar.


